Thứ Sáu, 19 tháng 10, 2012

ChrUbuntu on the ARM-based Chromebook: Let's Do This!

Update: We made it! Thanks to all who donated!

By now, you've probably seen that Google has announced a new $249 Chromebook and if you're reading this blog, no doubt you also know that unlike other Chromebooks, this one is based off of an ARM processor. That means these Chromebooks definitely will not work out of box with my ChrUbuntu 12.04 instructions which assume an x86 Intel processor.

However, I'm fairly confident that Ubuntu will run on these ARM based Chromebooks with a tad bit of work and some Google employees seem to agree with me. I can't really justify purchasing a new Chromebook since at last count, we have 5 Chrome OS devices in the house but I do want to see ChrUbuntu running on these units also. So I'm starting a ChrUbuntu on ARM-based Chromebooks campaign. Here's how it works:

  1. You donate an amount of your choosing to the campaign. Donations are accepted via PayPal so they're simple and secure. I'll keep this blog post updated with the total amount donated so far.
  2. If the donation fund doesn't reach $250 by November 19th (1 month from now), I'll refund all donors via PayPal.
  3. If the donation fund reaches $250, I purchase an ARM-based Chromebook and get to work on ChrUbuntu for ARM-based Chromebooks.
  4. I will do my very best to get ChrUbuntu running on the new Chromebook. If I'm successful, full details and scripts will be posted to this blog as has been the case for ChrUbuntu on the Cr-48, Samsung Series 5, etc. I'll keep the unit in order to maintain ChrUbuntu for ARM-based Chromebooks.
  5. If I fail to get ChrUbuntu for ARM-Chromebooks working by Jan. 1, 2013, I'll donate the unit to someone in need of my choosing (think along the lines of broke college student who has no computer).
If you're still reading, you can donate to the campaign here (goal reached, link removed, please stop giving me money).

Thứ Năm, 11 tháng 10, 2012

How to run Chrome OS (not Chromium OS) on a Virtual Machine

As part of my job, I often want to be able to demo Chrome OS to clients so that they can see how simple it is or to show them a concept such as enterprise enrollment. However, since Chromebooks aren't compatible with common screen-sharing applications like GoToMeeting.com or WebEx, it's not possible. Google+ Hangouts do work on Chrome OS but you have to have a user logged into the Chromebook, no demoing the login screen or enrollment process.

So I set out to find a way to run Chrome OS (the official code) on a virtual machine. Even before Chromebook hardware was available, Chromium OS, the open source base for Chrome OS has been able to run on virtual machines (see Hexxeh's nice nightly builds) but I didn't want to deal with the rabbit trail of Chromium OS vs. Chrome OS when presenting to clients, I wanted them to see exactly what they'd see on a Chromebook. So with a little scripting, I've managed to get Chrome OS running on VMWare workstation (should work on VMWare Player and Fusion also though I haven't tested). Here are the instructions:

Disclaimer: None of this is official or supported. I'm not responsible if Chrome or Chromium OS breaks your physical or virtual machine, destroys your data or re-elects Obama. The risk is entirely your own.

  1. Download this VMWare image. It's an unofficial, 200mb Chromium OS image. We'll use it as the base image, overwriting the Chromium OS filesystem and kernel with Chrome OS. The image is .tar.bz2 compressed. Windows users may need to download 7-Zip to decompress.
  2. Once decompressed, open the .vmx file in VMWare and boot the machine. You'll see Chromium OS boot up. Your VM should have Ethernet setup so the image automatically has Internet connectivity, no need to run through setup since we'll be blowing things away shortly.
  3. Press CTRL+ALT+spacebar. Release the spacebar but hold CTRL+ALT down and press F2. This switches us to the virtual console on Chromium OS (the spacebar is needed to make sure the VMWare guest and not the host OS pick up the CTRL+ALT key combo).
  4. Login as user chronos password chronos. We'll want Chrome OS to start with a fresh stateful partition as soon as we first boot it so run:

    sudo touch /mnt/stateful_partition/.developer_mode                   (password is chronos again)


    this tells Chrome OS that the system has been in developer mode and should be wiped when it next boots up. Since we're running on a VM, there's really no such thing as a developer switch like there is on a real Chrome OS device but Chrome OS assumes it's not in developer mode so it does the wipe for us.
  5. Now we're ready to download Chrome OS and overwrite Chromium OS. This step is pretty easy. Just run:

    wget http://goo.gl/4suhf; sudo bash 4suhf

    this will download a script and run it. The script takes care of downloading Chrome OS and overwriting your VM with it. You'll be able to choose which specific Chrome OS image you wish to use. All of the models I've tested have worked but if you're low on VM resources (RAM, CPU) then I suggest using Mario. If you want a 64-bit VM, use the Samsung 550 or Series 3 image.

    When the script finishes, you'll be back at the command prompt but attempting to run any commands will crash. This is because you're still booted into Chromium OS but you've overwritten your VM disk with Chrome OS. Just manually reboot the VM with the reset button. Your stateful will quickly be wiped and you'll see Chrome OS boot with that official logo!
Gotchas
  • Auto-updates don't work. You'll need to rerun the script in Step 5 to update. Sometimes the recovery image version lags behind the current stable version of Chrome OS.
  • Enterprise enrollment won't work out of box but it can be made to work. Hit CTRL+space then F2 (let go of space, hit F2 while holding CTRL the entire time). Run:

    sudo su -
    echo 'serial_number="1234567890"' > /tmp/machine-info
    restart ui

    replace 1234567890 with whatever serial you prefer. Then follow the normal CTRL+ALT+E method to enroll. If you have devices already listed in your CPanel you can choose one that's not been enrolled yet, use it's serial and be able to demo auto-enrollment.
  • For some reason I can't figure out, Chrome OS always want's to display at 1280x800 but VMWare only shows 1280x720 cutting off the bottom 80 pixels. It's something to do with the VESA BIOS on VMWare I believe (and the fact that Chrome OS expects an Intel graphics card that's not there on the VM). It's annoying that the bottom part of the screen where the clock, menu, etc are is missing. You can however use CTRL+Windows Key to pull up the menu of apps. If anyone finds a workaround to fix this, I'd love to know it. Update: turning the VM off and setting the monitor to 1024x768 forced in VM settings lets you see the menu bar. I couldn't bump the resolution higher than 1024x768 without cutting off the bottom.
Good luck and post in the comments how Chrome OS works in a VM for you!

Thứ Sáu, 7 tháng 9, 2012

How the Chromebox and Series 5 550 Got Their Codenames

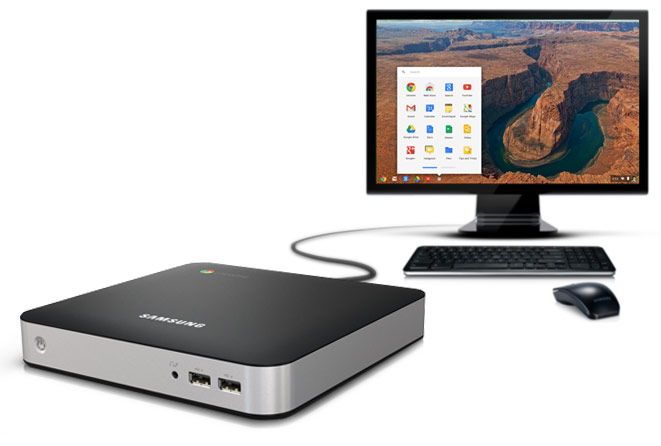
Bill Richardson is a Google engineer working on Chrome OS and the guy who originally put Ubuntu on Chromebooks (I just automated his work with a script and hosted image). He recently shared some really cool insight into how Chrome OS devices got their nicknames. For reference, the Samsung Series 3 Chromebox is know to engineers as Stumpy and the Series 5 550, Lumpy:

That name has a little history. Our cubicles have name plates on them. As a joke, someone added nameplates to the hardware lab door with the names of the seven dwarves from Snow White.  A couple of us were trying to remember all the names without looking, when the chief hardware guy stopped by to talk about the new desktop form-factor chromebook. He wanted to pick a clever project name, and since it was short and squat and we had similar-sounding names on our minds, I suggested Stumpy. He liked it, so it stuck. Then we wanted the laptop version to sound similar, and to keep them straight we started it with 'L' for "Laptop", which gave us Lumpy.

Some folks had a similar reaction to yours, but the thing to remember is that many engineers still have a childlike "playing with toys" enthusiasm. In our techno-geek culture, giving a silly or fun project name to something is an indication that we like it.

After the fallout from Apple's BHA project [link added by me] in the mid-90's, a lot of big companies stopped letting the engineers pick the names, which I think takes a lot of fun out of it.

I'm not sure why but the idea of a bunch of Google engineers sitting around trying to name off the seven dwarfs makes me laugh. 

Thứ Hai, 27 tháng 8, 2012

Update: ChrUbuntu 12.04 now works on Cr-48 and Samsung Series 5!

I'm happy to announce that I finally found the time to get ChrUbuntu 12.04 working on the original Cr-48 and Samsung Series 5. I achieved this by custom compiling 64-bit Chromium OS kernels for both devices. The instructions in the ChrUbuntu 12.04 blog post have been updated to point to the new script. A few things about this new version of the script:

  • The script now works on the 1st generation Cr-48 and Samsung Series 5 Chromebooks. A custom 64-bit kernel is used for Ubuntu. Newer Chromebooks will use the official 64-bit Chrome OS kernel found on the device at script execution time.
  • I don't have an Acer Chromebook to test with and there's no public overlay to compile for the Acer (ZFB) device. For now, these boards will use the Cr-48 kernel. If an Acer user tries this script, please report your results back here! I'm particular interested to know if the trackpad and audio work properly.
  • The script now detects the size of your hard drive and dynamically adjusts the maximum size you can select for the Ubuntu partition. Hardware modders rejoice!
If you're an original Cr-48 or Samsung Series 5 owner and are looking for a way to say thanks, consider upgrading or getting a family member a Samsung Series 5 550 Chromebook or a Samsung Series 3 Chromebox using these links. The price is the same but a portion of the cost goes to support this blog!

Thứ Bảy, 21 tháng 7, 2012

Coming Soon to Chrome OS: Auto 2-Step Verification via Bluetooth

Google's 2-Step Verification is one of the coolest security features I've ever used and it's free. But it's not cool when I'm in my comfy chair at the end of the day and my phone with the authentication code is on the other side of the room charging. It seems Google is looking to solve this major inconvenience to my life by adding Bluetooth support to the Android Google Authenticator app and to Chrome and Chrome OS also.

As usual, it seems Google is dog-food testing OTP remote access on their own employees. Hopefully that means we'll see this feature launch soon. The Chrome OS-specific code is currently getting punted to later and later releases (now at R23 which probably translates to this fall).

Thứ Tư, 30 tháng 5, 2012

Looking for 2nd Gen Chromebook / Chromebox owners to try Ubuntu install

Update: ChrUbuntu works on both the Samsung Series 5 550 Chromebook and the Samsung Series 3 Chromebox (i5 and Celeron versions). Thanks for all the reports! FYI, I also got a i5 Chromebox at I/O myself and it's crazy how fast it is!

The 2nd Generation Samsung Chromebook and the 1st Chromebox are out! I'm looking for testers to try installing Ubuntu via the script on both of these devices. In theory, it should work but I can't say for certain. Worst case scenario, a USB recovery may be necessary.

It's not clear if these new devices will ship with a 32-bit or 64-bit version of Chrome OS since Chrome OS 19 and 20 were 64-bit but seem to have reverted to 32-bit in later releases. If the 12.04 install process errors out with "you need to be running a 64-bit version..." then try the 11.04 install process if you could.

If you try the install, let us know how it goes in the comments! In other news, I'm aware the 64-bit Ubuntu 12.04 installer won't work on Chromebooks any longer since Google reverted to 32-bit builds. I'll see if I can get a 32-bit release out soon.

Thứ Bảy, 28 tháng 4, 2012

ChrUbuntu 12.04. Now with double the bits!

Update #4: There's a new version of the ChrUbuntu script that offers much more flexibility. Be sure to check out my latest post at ChrUbuntu: One Script to Rule them All!

Update #3: I've updated the script so that module loading works with beta and dev channel Chrome OS kernels. If you were on beta or dev channel and ChrUbuntu booted but you couldn't connect to WiFi/ethernet, try now. Thanks to not-so-lazy commenter "The Lazy Husband" for the pointer and fix. I've also added a possible fix for some people getting out of space errors. The script below now works with external USB Flash and SD Card ChrUbuntu installs.

Update #2: Instructions for installing to an external USB or SD Card are up!


Update: The script now works on older Cr-48 and Samsung Series 5 Chromebooks. For details, see this blog post.

I'm excited to announce the release of ChrUbuntu 12.04! ChrUbuntu is a clean install of Ubuntu 12.04, the latest Long Term Service release customized to run on Chromebooks. This is the first Ubuntu for Chromebooks that is 64-bit which means it will be twice as fast! Okay, maybe not but it'll at least be compatible with the new Chromebook and Chromebox :-) Also with this release, Chromebook features like 2-finger scrolling and audio and brightness controls work out of box.

Installing ChrUbuntu is extremely easy, just follow the steps below. Want to say thank you for ChrUbuntu? Feel free to do so in the comments below or show your support by visiting the advertisements on this blog. If you purchase a Chromebook or any other Amazon items using the links on the right, I get a small portion of the cost :-)
  1. To get started, make sure your Chromebook is in developer mode and has a developer BIOS installed. See Google's instructions for the Cr-48, Samsung Series 5, the Acer AC700, or the 2nd generation Samsung Series 5 550 and Chromebox Series 3 depending on your model. Samsung and Acer owners should pay special attention to the Developer BIOS instructions.
  2. Reboot your Chromebook but do not login. Make sure you have a WiFi or Ethernet connection at this point. 3G is not recommended. Press CTRL+ALT+=> (=> is the forward arrow where the F2 key would be on a PC). Do not use the normal CTRL+ALT+T method to get a shell. Use the CTRL+ALT+=> method while no one is logged in.
  3. Login as user chronos, no password is needed.
  4. As the chronos user, run:

    wget http://goo.gl/tnyga; sudo bash tnyga

    Make sure you have the command exactly right. tnyga is all lowercase letters and would sound like "tee in why gee aye" if you said it out loud (go ahead, try it!). If you get a "not found" error, make sure you have Internet connectivity.
  5. You'll be prompted with some information about your Chromebook. You may need to run an additional command to install a developer BIOS on your Chromebook or, if you have a 1st generation Chromebook, you might be notified that a special non-official kernel will be used to allow 64-bit Ubuntu to run on your hardware. Press Enter to continue.
  6. The Chrome OS stateful partition where your data and settings are stored is just short of 11gb by default, the script shrinks the stateful partition to make room for ChrUbuntu. You can choose to give ChrUbuntu from 5gb up to 10gb in 1gb increments (Note: If you've installed a larger SSD in your Chrome device, your max number and recommended max will be larger). I recommend not going higher than 9 as 10 leaves Chrome OS with very little free space (less than 1gb). Once you've entered a number, your hard drive will be repartitioned. It may look like the Chromebook is doing nothing for 10-15 minutes but let it be, after awhile it will reboot and re-initialize the stateful partition. This process takes about 5 minutes and then the Chromebook reboots again and shows you the Welcome screen you got when you first turned on your Chromebook out of the cardboard box.
  7. Go through the Chrome OS setup process again until you get to the Google login page. You'll need to have a WiFi or Ethernet connection again at this point. 3G is not recommended. Now follow steps 3 through 5 again. This time the script will see that you've already made room for Ubuntu and will start downloading the ChrUbuntu image and copying it to the SSD.
  8. There are 52 100mb files to be downloaded. Each is compressed so the actual download size ranges from less than 1mb in size to 90mb in size. The total size of all the files is about 1gb compressed and 5gb uncompressed so the download and install will take awhile. The files are named ubuntu-1204.binXX.bz2 (where XX is aa, ab, ac, ad, ae, af... ba, bb, bc... all the way to bz). If you want to see how big each piece is, take a look here.
  9. The script keeps track of which of the 52 files have been successfully installed so if you lose Internet connectivity, or the battery dies (you should be plugged in BTW), etc, just re-run Step 8 and it should resume where it left off.
  10. After all 52 files have been downloaded and copied to the SSD, the script will make a few more updates to your Cr-48 and then reboot.
  11. You'll see ChrUbuntu start up! The username is "user" and the password is "user" if you need to make changes.
  12. Right now, you're in ChrUbuntu but if you reboot, you'll be back in Chrome OS. To make ChrUbuntu the default, run:

    sudo cgpt add -i 6 -P 5 -S 1 /dev/sda

    (password is "user"). It should be possible to run this from ChrUbuntu or Chrome OS.
  13. To make Chrome OS the default again, either turn off Developer Mode, or run:

    sudo cgpt add -i 6 -P 0 -S 1 /dev/sda